

A place for art, play, and nonsensical musings.
Saturday, November 5, 2011
She Who Must Paint
I'm still working in my postal book, but I am really feeling the need to take a break from it lately. I need to paint something. I have a book I started a few years ago - it has canvas pages which have mostly been prepped with gesso and/or green paint. I never bound the pages, and also I couldn't figure out which direction I wanted to go with it. But I got it out and played a bit. I wanted to try lettering on it, and I made some scribbles with different pens. I painted the center of a couple of pages with lighter colors so I'll have a place for a focus of some kind. Don't know where I'm headed (and I may not even work in it again for weeks), but it's there in my mind now, with ideas to mull over.


Thursday, November 3, 2011
Good Mail Day
Sometimes I think the internet is an outlet for bored people who do ridiculously stupid things and waste an enormous amount of time. Other times, I appreciate the internet for what it gives us. We "meet" people we have things in common with, people we might never have met otherwise.
So it is with someone who was a fellow student in one of my online classes. Caatje lives in the Netherlands and I recently sent her some security envelopes with different patterns, because I hate to see anyone without their own cool security envelopes. In return, she sent me an envelope bulging with some fun things from "her" island of Vlieland. Wow-oh-Wow! I am still riffling through all the cool things. She included a magazine called Flow. What a feast for the eyes. Even though it is mostly in Dutch, I have enjoyed it anyway. I can tell one article is about stamp carving, and it's fun to guess at the rest. She sent postcards, tourist publications, and maps, among other things. Thank you so much Carin!! What an amazing part of the world!


So it is with someone who was a fellow student in one of my online classes. Caatje lives in the Netherlands and I recently sent her some security envelopes with different patterns, because I hate to see anyone without their own cool security envelopes. In return, she sent me an envelope bulging with some fun things from "her" island of Vlieland. Wow-oh-Wow! I am still riffling through all the cool things. She included a magazine called Flow. What a feast for the eyes. Even though it is mostly in Dutch, I have enjoyed it anyway. I can tell one article is about stamp carving, and it's fun to guess at the rest. She sent postcards, tourist publications, and maps, among other things. Thank you so much Carin!! What an amazing part of the world!


Tuesday, November 1, 2011
November Squared
It's not unusual for me to work in more than one journal at a time, but as this year has gone along, I seem to have more journals than I can keep up with. I'm a victim of runaway journaling. So for November, I am going to step back and slow the pace a little. I got the idea from an article in the recent issue of Somerset Studio, and I have started a square-a-day calendar for November. It looks plain now, but it will perk up by the end of the month.


The article in Somerset (Nov/Dec 2011 issue) is about artist Kate Crane - see more of her work here.
It felt good to splash some paint on my November page - but that doesn't mean I've abandoned my postal book. No page is ever finished - I am always finding more to add!


Saturday, October 29, 2011
Do Not Discard
More pages from my envelope book (it appears it will be "in progress" for years to come). I keep digging around and finding more things. I keep trying to organize envelopes and stamps and cool envelopes as I come across them before I drown in them. For your amusement...


These are all partially finished. I found a copy of an envelope I mailed where I used the Queen (love) stamp and drew a body for her on the envelope. The last spread shows an envelope on the right that I received in an exchange. It was a Mizzpelled Envelope Exchange - the rule was to misspell pretty much everything and see if it arrived at its destination. I got some great and creative envelopes. Since my postal people know me, I do believe if someone sent a decorated envelope to just my zip code, I'd probably get it. Maybe.


These are all partially finished. I found a copy of an envelope I mailed where I used the Queen (love) stamp and drew a body for her on the envelope. The last spread shows an envelope on the right that I received in an exchange. It was a Mizzpelled Envelope Exchange - the rule was to misspell pretty much everything and see if it arrived at its destination. I got some great and creative envelopes. Since my postal people know me, I do believe if someone sent a decorated envelope to just my zip code, I'd probably get it. Maybe.
Wednesday, October 26, 2011
The Blue Queen

There are reasons why I haven't posted lately.
It's almost Halloween and I feel like a zombie.
I'm working a lot and I feel like a zombie.
I'm missing sleep and I feel like a zombie.
Okay, enough with the zombie.
Maybe I was gathering stuff to send to Gaye, like some Stamp Cash from a vintage postal board game I forgot I had.
Maybe I was working on a Green Page in my book.


Wednesday, October 19, 2011
Postal Museum
You know, not too long ago I remember being obsessed with my visual journals and experimenting with texture techniques. I must be really fickle, because I have not even touched any of that since my postal obsession. So bear with me while that continues!
You might be interested to know that you can download some freebies from the U. S. Postal Museum website. This is not to be confused with the U. S. Postal Service. Case in point... when I submitted an envelope to the Graceful Envelope contest a few years ago, I accidentally left off the post office box number in the address. Apparently, the U.S. postal service does not know where the U.S. postal museum is, and they sent the envelope back to me!

Anyway, you can visit the museum website and use their options to make stationary. Rather than make stationary, I put several stamp designs on the page in different sizes and printed those. I also explored all the drop down menus to see what else was there and printed some other things.
 Here are a couple more things from their website, but I can't remember where I found them. I was exploring further and came across them somewhere.


Lastly, my post office box rent is due this month, and my postmaster likes it when I decorate my envelope. It's fun for me to surprise her each year.

You might be interested to know that you can download some freebies from the U. S. Postal Museum website. This is not to be confused with the U. S. Postal Service. Case in point... when I submitted an envelope to the Graceful Envelope contest a few years ago, I accidentally left off the post office box number in the address. Apparently, the U.S. postal service does not know where the U.S. postal museum is, and they sent the envelope back to me!

Anyway, you can visit the museum website and use their options to make stationary. Rather than make stationary, I put several stamp designs on the page in different sizes and printed those. I also explored all the drop down menus to see what else was there and printed some other things.


Lastly, my post office box rent is due this month, and my postmaster likes it when I decorate my envelope. It's fun for me to surprise her each year.

Go forth and postalize something!
Sunday, October 16, 2011
Time Warp
I think I was abducted by aliens yesterday. I lost several hours of my day that I can't account for. Either that, or I sat down for a simple organizing task and the next thing I knew, I had lost track of time. I blame the postal books I've been working on. They have me digging deep, deep into the archives of unused items for stuff to use. So when I came across this baggie of old postage stamps, it seemed like a good idea to clean and sort them. I don't remember where they came from. Either I found them at a yard sale, or Gaye did and gave them to me.


How so much debris got into that bag is beyond me. But after pulling out a few stamps to use and having to clean them off, I decided to clean the bag full and sort them by colors. It was a yucky job, but I knew it would be worth it.

(FYI, the time I spent was indeed worth it, but I only got through about three-fourths of the bag before I felt like I had turned into the stamp zombie. So I'm still not finished.)
I have managed to add some more things to the pages of one book in the last week. Stamps, postcards, old envelopes, photos, anything that might be postal related. For now, they don't seem to have any rhyme or reason. But I have high hopes that it will somehow all pull together over time.


Sunday, October 9, 2011
Postal Alert No. 2
So much for tackling that weekend to-do list. I'm pretty sure I did nothing but work on this book cover for almost a full day yesterday. But so worth it! The insides will have to wait for now. I can't stop picking up these two books and looking at them. The part on the front with my name is a layering of multiple window envelopes, each with different wording to tell me how important the recipient of the mail is! Turned out pretty nice.


By the way, the triple chain stitch on the book above, as well as the sewn-on-tapes on the other postal book in my previous post are both taught in Mary Ann Moss's Full Tilt Boogie class. If you have considered taking this class, she has lowered the price through the end of this month. Very inspiring and highly recommended if you love making books with abandon. See more here.
(Disclaimer: No, I do not get a kick-back and I am not affiliated, just a satisfied student. I like the fact that the videos and class info are up indefinitely, so no rush to finish everything in a set amount of time.)
Boogie on.....
Saturday, October 8, 2011
Mail Call
I'm still playing with security envelopes when I get a chance. Had a really fun day when friend Chris came down from Indianapolis to Gaye's house and Gaye showed us the book she was working on. Chris and I made one like hers, using cardboard envelopes as covers and security envelopes for pages. In the photo, ours are the two standing in the back, and Gaye's book is in the front, showing the inside.
 Below is Gaye's cover (slightly different than ours). I love what she has done with her book so far.

I'm also still working on my book that I started a couple of weeks ago. Mine uses cardboard from a priority mailing box for the cover and security envelope pages. I finally sewed it last night, using the sewn-on-tapes method.
 I can't wait to tackle the insides of both books. But it is incredibly time-consuming, even though it looks like all you do is just gather some envelopes and add some stuff! I have stuff spread out everywhere, trying to figure out what to add where. I can't wait to show these to my postmaster, as she is the one who gave me several of the legitimate postal stickers back when I was teaching mail art classes.


I'm also still working on my book that I started a couple of weeks ago. Mine uses cardboard from a priority mailing box for the cover and security envelope pages. I finally sewed it last night, using the sewn-on-tapes method.

Tuesday, October 4, 2011
Check it out
I am itching to get back to my security envelope book shown in the last post, but I've been occupied with other things. However, I have been gathering bits of stuff to put in it.
In the process of doing that, I came across the checkbook register I showed on my blog in August 2010. Now, some people might be shy about saying they came across a project they started over a year ago and didn't finish. Not me! If I start something, even if I don't finish it at the time, I at least won't forget the technique I wanted to try. If I had never started this project, I would never ever have remembered it by this time. If you recall, I was inspired by someone else who had taken a class with Orly Avineri and they made a book from a checkbook register. At the time, I painted my pages and that's about it. The last few days, I have added more and more, but it has a long way to go before it is really fattened up like I want it to be. I love picking it up and flipping through the pages, even though I already know what's in there. I am going to fatten it up like a Thanksgiving turkey!


In the process of doing that, I came across the checkbook register I showed on my blog in August 2010. Now, some people might be shy about saying they came across a project they started over a year ago and didn't finish. Not me! If I start something, even if I don't finish it at the time, I at least won't forget the technique I wanted to try. If I had never started this project, I would never ever have remembered it by this time. If you recall, I was inspired by someone else who had taken a class with Orly Avineri and they made a book from a checkbook register. At the time, I painted my pages and that's about it. The last few days, I have added more and more, but it has a long way to go before it is really fattened up like I want it to be. I love picking it up and flipping through the pages, even though I already know what's in there. I am going to fatten it up like a Thanksgiving turkey!


Tuesday, September 27, 2011
Possibilities
This might become a book cover.
 Or... this might become a book cover.

 Go with the flow. Follow the muse. See what happens.
Whatever happens, it will involve security envelopes and lots of them.
 My best friend Gaye has been playing with security envelopes, and it made me want to also. The only thing is, we haven't seen each other in ages, so it will be fun to get together later and see what we both end up with!

I also got distracted and made some "tiles" for my cover. I remember seeing a Tim Holz video where he used his Fragments clear tiles. I made mine by using JudiKins Diamond Glaze to glue old postage stamps (among other things) to the clear tiles. I think he used Glossy Accents instead of Diamond Glaze, but they both work and both dry clear.
I can't wait to play more with pages and get the book finished.


Or... this might become a book cover.

Whatever happens, it will involve security envelopes and lots of them.


I also got distracted and made some "tiles" for my cover. I remember seeing a Tim Holz video where he used his Fragments clear tiles. I made mine by using JudiKins Diamond Glaze to glue old postage stamps (among other things) to the clear tiles. I think he used Glossy Accents instead of Diamond Glaze, but they both work and both dry clear.
I can't wait to play more with pages and get the book finished.
Tuesday, September 20, 2011
The Dark Side
Today's Adventures in Texture takes us to the use of gesso and a rubber stamp. This journal page started out bright and red, but as time went on, it ended up kind of dark.
I painted a double page spread with red acrylic paint and let that dry. Then I swiped some clear gesso down one side of one page. I let that dry somewhat (about 15 minutes because I'm impatient, but I should have waited about 10 minutes longer).
 Then I pressed a rubber stamp into the gesso. Since my stamp is just a piece of rubber and not mounted on wood or cushion, I immediately put the stamp in water so the gesso would not dry on it. The gesso then needs time to dry completely on the page.
 I then painted over the gesso impression as well as the rest of the two pages with some brown acrylic ink. The last thing I added was black, applied with a rubber stamp pad around the edges of the pages and over the gesso impression.
 Yep, I've gone over to the dark side on this one, and I like the grungy-ness.
I painted a double page spread with red acrylic paint and let that dry. Then I swiped some clear gesso down one side of one page. I let that dry somewhat (about 15 minutes because I'm impatient, but I should have waited about 10 minutes longer).


Sunday, September 18, 2011
Text-ured Skin
I have been going in a hundred directions all of a sudden. Similar to what I do every spring and fall. I think it's because the heat wave has gone away and days are crisp and happy, much more conducive to making art.
After I made rusty skins, the next day I made skins from pages of old books. I figured the print was more likely to come off the page on older books. And I knew I'd have to use the skins with the lettering backwards, but that didn't bother me. I put them on cardboard to dry, put them up high so they were out of my way, and promptly forgot about them. It was a nice surprise to stumble across them a day or so later!

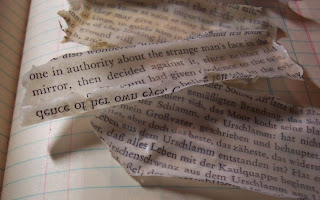
 I think I'll be able to find a place to use these in the future. I should be able to use them either frontwards or backwards, although I do wish I'd made a couple of them thinner. Like the rust skins, these were made by spreading soft gel medium, then letting the medium dry. When they were pulled off the page, of course a lot of paper came with it, so I soaked them in a bowl of water, then rubbed off the paper with my fingers.
I also did some journaling on the page I showed earlier. No special plans for that page, just some random stuff I came across!

After I made rusty skins, the next day I made skins from pages of old books. I figured the print was more likely to come off the page on older books. And I knew I'd have to use the skins with the lettering backwards, but that didn't bother me. I put them on cardboard to dry, put them up high so they were out of my way, and promptly forgot about them. It was a nice surprise to stumble across them a day or so later!


I also did some journaling on the page I showed earlier. No special plans for that page, just some random stuff I came across!

Wednesday, September 14, 2011
Rusty Skin
I have rusty skin. And I'm perfectly fine with that.
I picked up a new book not long ago, and it has a lot of interesting techniques to try. There is one section about making "skins". I'm familiar with spreading acrylic paint, letting it dry, then peeling it off to use for a collage element.
But I was intrigued with possibly making a rusty skin by spreading soft gel medium over a rusty object. I got my rusty object (if you've read this blog from the beginning, you might recognize this object which I found in the road in front of my house once. My guess is that it is an old tractor foot pedal.) I spread the medium on the back side and waited for it to dry (about 5 hours, with the help of a fan blowing on it). I liked seeing veins of rust showing through as it dried.


When I finally peeled it off, I was a little disappointed that it was mostly black from the blacker parts of the metal, not the pretty rusty brown. But it IS a soft, flexible, usable skin, as the book promised.
I wanted to try again for the perfect rusty color, and spread a thinner layer on the other side of the object. It was still drying when I took pictures, so I don't have the finished skin, but I don't think it will be what I am looking for either. I'm sure I'll try this again though. I just have to find the right rusty objects!

While waiting for things to dry, I spied my journal on the table where I had stamped with wallpaper last week. I decided to put masking tape on the pages, sponge color around the tape, then peel off the tape. I am seeing some great places for journaling on these pages!


I like having a lot of projects on the back burner. But I think I'm going to need a bigger stove, with a lot more burners!
(Forgot to mention the book that has the rust technique. It is Surface Treatment Workshop by McElroy and Wilson. I was so taken with all the techniques that fill this book, I paid full price at the bookstore, rather than waiting to order from amazon!)
Subscribe to:
Posts (Atom)